When figuring out how to split the work for this final project, I propose that since I was familiar with JavaFX, I would make the GUI application for the final application while Alvin will focus on making the database for the final application.
What both of us will do is then when both of our time is available, we would assess on what we have both done together using applications that allows us to both share our screen and we would then stitch both of our progress together by me sending Alvin the java files to then we are going to be connecting the database to the application as well as trying to properly send the data from the database so it can be communicated directly to the GUI application and doing some bug fixing together as well.
The Music Shop is the final result of the collaborative effort from Fadhlan and Alvin for Database Systems application final project. The final application is separated for customers, sellers, and managers.
General
Login Screen
When a user opens up the program, they will be greeted with login form. Existing user would only need to input their username and password while new user would be required to register their account first.
Register Screen
When a new user opens up the register screen by pressing the register button in the login screen, they will the be redirected to the register screen. Here, the user can enter their information for their account.
Customer Side
Catalogue Screen
This is the default screen when a customer logs in to the application. In this screen the customers would have access to different features such as search items, add items to their shipping bin, etc.
Search Function
The customer would be able to input a text in the search box and finds instruments/items that match anything that they input in the search box. The inputted text would be accounted in the searching from the name of the item, category, or the description.
Adding Items to the Shipping Bin
The add button is used to add item to the shipping bin. The remove button is similar with the difference being used to remove an item from the shipping bin.
Order Button
By pressing the order button, the user would then be greeted with the checkout screen where the user can finalize the order by pressing the order now button or cancel their order by pressing the cancel order button.
Receipt Screen
After pressing the order now button, the user would then be able to see their receipt showing their order number as well as their total item price and delivery address.
Edit Profile Button
In the first screen, there is an edit profile button located in the top left of the screen. This will get the user to this screen where customers could see their order list or edit their profile by changing username, password, or other details.
Customer Orders
Edit Profile Button
Employee Side
Login Screen
If a manger of the store already assign a user’s account as an employee account, they could login by checking the employee check box to login to the application as an employee.
Use Kai as the username with 12345 as the password to access as the manager.
Greeting Screen
In the greeting screen, their role would be shown. The roles are separated between the seller role and the manager role. The manager role would have access to the employee database while the seller role would only have access to the instruments database. Both of the roles have their edit access to their respective databases.
Manager Database Screen
When a manager press the employee button, they would have access to the employee database screen. Here, a manager can filter the details of each employee as well as editing or creating new employee. The seller button would be changed to the instrument button in which case it would redirect the scene into the edit instruments database screen.
Create Employee Prompt
Finally both the managers and seller would have access to the show database button. By pressing this button it will show all the databases of the application
Theme: Creating a Database Application using MySQL
The Music Shop
For the 3rd Semesters database systems final project, me (Fadhlan), Rafi, and Alvin were tasked to create an application that utilizes a database created using MySQL. We all decided to create a music store application that initially were only designed for customers to order or buy instruments. However, throughout the project it evolves with us adding more features eventually deciding to create the application that users who login would be directed to different scenes depending on their account. Customers would have their own separate scenes while employees and managers would also have different scenes.
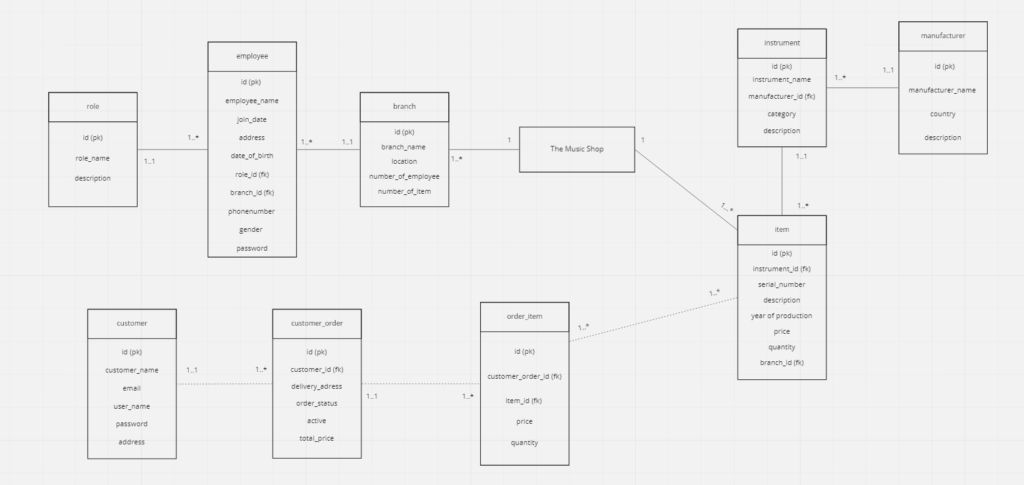
This database is currently in the first stage of normalization. Each table should only have one value and each record must be unique in the first normalization. Examining each record in the database will demonstrate this. We assume that there is no double entry inside the database. The second normalization necessitates the use of a single column primary key that is not operationally reliant on any subset of candidate key relationships. Every table in our database has an id column that serves as the primary key and is independent of other columns. The database must not have any transitive functional dependencies for the third normalization. When a non-key column is changed, it may cause any of the other non-key columns to change, which is known as a transitive functional dependence. The diagram that we have does not have any functional dependencies, as we can see on the ERD. I believe we have done an excellent job of eliminating any inter-dependencies between the attributes as a group.
Relational Schema
Here is a relational schema that we have came up from the ERD that we created.
role(id, role_name, description) Not Null (id, role_name) Unique (id) employee (id, employee_name, join_date, address, date_of_birth, role_id, branch_id, phonenumber, gender, password) Not Null (id, employee_name, join_date, address, date_of_birth, role_id, branch_id, phonenumber, gender, password) Foreign Key role_id references role(id) On Delete Restrict On Update Cascade branch (id, branch_name, location, number_of_employee, number_of_item) Not Null (id, branch_name, location, number_of_employee, number_of_item) Unique (id) manufacturer (id, manufacturer_name, country, description) Not Null (id, manufacturer_name, country) Unique (id) instrument (id, instrument_name, manufacturer_id, category, description) Not Null (id, instrument_name, manufacturer_id, category) Foreign Key manufacturer_id references manufacturer(id) On Delete Restrict On Update Restrict item (id, instrument_id, serial_number, description, year_of_production, price, quantity, branch_id) Not Null (id, instrument_id, serial_number, year_of_production, price, quantity, branch_id) Foreign Key instrument_id references instrument(id) On Delete Restrict On Update Restrict Foreign Key branch_id references branch(id) On Delete Restrict On Update Restrict customer (id, customer_name, email, user_name, password, address) Not Null (id, customer_name, email, user_name, password, address) Unique (id, user_name) customer_order (id, customer_id, delivery_address, order_status, active, total_price) Not Null (id, customer_id, delivery_address, order_status, active, total_price) Foreign Key customer_id references customer(id) On Delete Restrict On Update Restrict order_item (id, customer_order_id, item_id, price, quantity) Not Null (id, customer_order_id, item_id, price, quantity) Foreign Key customer_order_id references customer_order(id) On Delete Restrict On Update Restrict Foreign Key item_id references item(id) On Delete Restrict On Update Restrict
When we were told that we are required to make a game as one of our projects at Binus University, my mind just went flying to come up with anything that might be taken as the inspiration and foundation for the project. I decided to team up with Jevon to tackle this project together. As the first planning phase began, I came up with the concept of teaching colors or trying to come up with a game that has a heavy influence of colors in it. So I came up with a game that incorporates color and color mixing as part of the combat. After telling this idea to Jevon, he expanded the idea and created a concept where the game would draw heavy influences from pokemon and slay the spire. After a bit of thinking and discussing, we ended up deciding that there will be two gameplay styles. The exploring,or as we called the overworld, is inspired by the classic pokemon games and enemy movement similar to games such as earthbound. And also, the Battle phase, or as we called the engaged mode that draws inspiration from games like slay the spire. We agreed that there will be at least two levels and maybe even a third level, with each level going to have its own distinct themes.
Splitting the work
We decided to split the levels for each person. So I worked on the first level,which is the grass theme overworld,and then Jevon worked for the desert theme overworld. We decided to use our own assets,at least for the visuals,for the time being. The rest of the job deciding came up on its own outside of the initial planning on who is going to do what.
My Contribution and Difficulties
The first thing I did was watch many general tutorials regarding the Construct 2 Game Engine. Even though most of the tutorials are quite boring and sometimes not thorough on the concept, I managed to get a grasp on how the engine will operate. So for the next thing that I do, I created a tilemap for my grass theme level. After countless hours of looking at hundreds of reference images, I finally created the first version of the tilemap using the software marmoset hexel.
The next thing that I did was planning on the level design of the level. At first, I thought this will be the easy part of the work, but it turned out to be the hardest part and took the most time to get done. Trying to create a level that looks nice and also not confusing in terms of gameplay is not an easy feat to accomplish. Figuring out the path that the player has to take while also still keeping the level to make sense is not as easy as I thought. I was stuck on how to make the level open enough but still make it a linear level. Finally, I decided to create NPCs that will give the player quests to complete in order to progress to the next area of the level so that the player will not just wander aimlessly and get lost in the level. By making the NPC it serves as a barrier and also serves as the pointer on which the player is now currently located. The hard part on the NPC and quests is adding the dialogue system for the player and the NPC. There are no tutorials that explain the concept of showing a dialogue and ending the dialogue by pressing the same button. Every tutorial that I came across makes it that the player shows the dialogue by pressing ‘E’ and closing it by pressing ‘ESC.’ I don’t want that to be the game dialogue system. So through trial and error, I was finally able to create the system to show the dialogue and ending it by the press of a single button. It was hard, but when I finally was able to make it work, I felt a rush of satisfaction. The next problem is that the game was not able to track back to where it was after the player entered the engaged mode. Thankfully it’s not a hard fix. By just adding a built-in save and load system from the game engine, it was easy to be fixed.
For a while, I left the continuation to work for the overworld, I focused on making the UI so that the game is much more presentable for a presentation that is required by the lecturer. So I decided to make a pause menu and also tidying up the code for the volume slider that is created by Jevon. For creating the pause menu, thankfully, I already have the reference from the dialogue system that I have made for the game. So I was able to make the pause menu in quite a short time. And for the volume slider, it’s just changing a few numbers and adding a few more lines of code.
As the deadline is closing, I finished my grass level by adding the last area and NPC quests and also an object that would transition the player to the next level. It was just copying the previous dialogue code and just changing the variable to fit with the new NPC. And as for the transition, I just create a sprite of a door and the animation of the door opening. So that when the player interacts with it,the door will open,and the player would just be magically transported to the next level.
Final Thoughts
In hindsight, we kind of bit more than what we could chew. We were planning to create three levels, but in the end, only two levels were made. Doing this project made me realise that a game dev’s life is more complicated than I thought. Seeing it now as a professional project, I would be ashamed to think about it. But, looking at as an amateur project, I was quite happy with how it turned out.
As one of the projects created for Binus University’s course, Color Splash is a child-friendly game created by both me, Fadhlan Muhammad Razan and Jevon Danaristo.
Showcase
Image showcase of our game Color Splash:
The player in the grass overworldEnemies and items scattered in the overworldBattle UI
Gameplay
Overworld:
The overworld is where the player starts the game, the player can move and interact with NPC that are in the overworld. Overworld also got item pick-ups to unlock certain areas and slimes that will always try to get close to the player when they are in sight with the player. When the slime is in contact with the player, the battle mode began.
Battle:
Color Splash is a game where players need to recognize the relation between color based on the game logic. For instance, in the game, blue will beat red, red will beat yellow, and so on. When the player drags the right color to the opponent’s color, the player’s strength will be increased, indicated by the strength sign. The strength sign indicates how much damage the player will inflict on the enemy every time the round ends.
Player Controls
Overworld:
A – Move left
S – Move down
W – Move up
D – Move right
Esc – Pause
Battle mode:
LMB – To interact with buttons
LMB and mouse drag – To drag colors
Team Contribution
Fadhlan contributes on making the first overworld tilemap, character sprite, dialogue mechanic, pause menu, NPC, player model, player animation, and player movement.
Jevon contribute on making the second overworld tilemap, slime sprite, slime movement and detection, battle layout, battle mechanic, and menu layout
Original Assets
Every sprites and tilemap on Color Splash is made by our team, character model, enemy model, npc model, animations, and user interface are either made by Fadhlan or Jevon.
Comp6341 – Multimedia and Human-Computer Interaction
Theme: Creating an educational game for a kindergartener
Color Splash
A game project that me and Jevon are currently creating for one of the Multimedia and Human Computer Interaction projects. It is designed to teach kindergarteners about colors in the form of an interactive and fun video game. It will teach about the application of colors in art and the real world and the concept of combining and mixing colors to create new colors with existing colors. In addition to that, this game will also teach kindergarteners always to be attentive and always exploring.
Gameplay
The gameplay for color splash is mainly divided into two parts: the exploring state and the engaged state.
Exploring
When exploring, the player can explore the world (levels) to find the keys needed to progress to a different world. It could be in the form of anything. So, try exploring to find secrets that might be hidden across the world!
Engaged
While exploring, players may occasionally come in contact with the game’s enemies. If a player comes in contact with one of those enemies, the player would be in an engaged state and would need to use colors to defeat the enemies according to the enemy types.